Getting Started with Bluetooth Low Energy using Xamarin
- Jul 24, 2016
- 4 min read
When I got my Lightblue Bean from Punch Through I was so excited to get started with BLE (Bluetooth Low Energy) integration with Android/iOS devices. However, I found myself searching and fiddling with code for hours to get it to finally work with Xamarin. To save others frustration and wasted time, I have created this blog on the errors I came across and the changes I made to the original example code given by Monkey.Robotics (here). The complete code for this tutorial (including the Xamarin code and Arduino code) can be found on my Github account here.
Error Fixing
Clean The Solution!
The first thing you need to do is CLEAN THE SOLUTION. This will solve obscure errors that seem to make no sense. Errors like "Target named 'UpdateDesignTimeXaml' not found in the project. (TISensorBrowser)" will be solved.

Another thing to be aware of is the bin and obj folders in TISensorBrowser.Core. If you compile and run the solution from one directory (let's say your Downloads folder) and then move it to your desktop and decide to run it again, you will get an error about not being able to find the path to some debug files in bin and obj. The problem is the program is trying to find the debug files that were in the path to your old directory, however you moved them all. To solve this, go into the new directory and delete the bin and obj folders from TISensorBrowser.Core and then clean the solution. New bin and obj folders will be created for the new directory and the errors will disappear!
Getting Your Targets Right
The second thing you need to do is make sure the targets in BluetoothTISensor/TISensorBrowser.Droid/Properties/AndroidManifest.xml are set to the device you are using. I am using an LG G4 that needs target framework version (API 18), here is an image of what my target configurations look like.

Installing the right Android Level
Another error I faced was not having the right Android Level installed. This error may not happen to you if you already installed the needed Android level for a different project. However, if you see something in the Error Messages saying path to Android Level ## cannot be found then follow my lead! In Xamarin, go to Tools>Open Android SDK Manager.
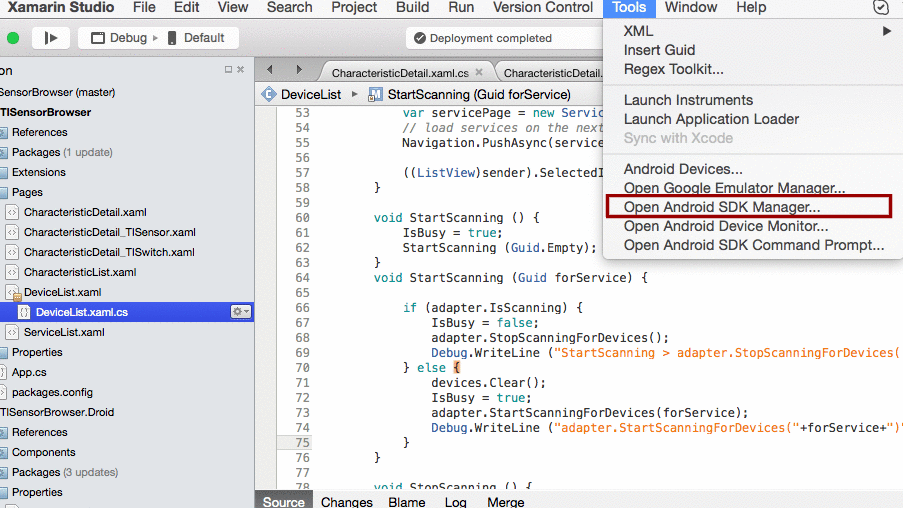
Once the Android SDK Manager is open, look for the Android Level that the error message says you are missing and install it.

Code
Arduino Code
The Arduino code (here) is fairly simple. When the Bean is connected to another device its onboard LED will be green, if the Bean is not connected, or gets disconnected, the onboard LED will be red. When connected the Bean will send its temperature to the other device (your phone) using Scratch Characteristics. In my example, I send the information on scratch characteristic 2.
Xamarin Code - Receiving the Scratch Characteristic
As mentioned in the Arduino Code section, I sent the information on scratch characteristic 2. However, when you have selected your device and fully connected to it, you will be brought to the Service List page which will look something like what is shown on the left below.

1. When you are here you may be wondering, "Bro! Where's the temperature I sent from my BLE device??". Well, check under each of the headers and you will see a long ID for each service. From the your BLE devices documentation you should be able to identify the scratch service's ID. For the Bean, the scratch service ID is "A495ff20-C5B1-4B44-B512-1370F02D74DE". As you can see in the figure to the left, I was able to locate the scratch service based on its ID. Click on this item in the ListView.

2. Once you are in the Characteristic List you will see 5 possible options. What a coincidence, the Bean supports 5 Scratch Characteristics! I am kidding, these are the 5 scratch characteristics that the Bean can potentially use to send/receive data from other devices. Notice the IDs are quite similar to that of the Scratch Service; the only difference is that the service started with "A495ff20-", while the characteristics are "A495ff2#-". The # sign represents the Scratch Characteristic number. Before I mentioned that the Arduino code puts the temperature information on Scratch Characteristic 2, so lets click characteristic that starts with "A495ff22-" .

3. In this page you can see the information that this Characteristic has. Under Raw Value you can see the current temperature that the Bean is sensing. The data is originally extracted in hexadecimal, which is why I have added some code to convert the value to decimal.
Closing Remarks
I hope you enjoyed my Getting Started Tutorial for Bean Xamarin integration. In future projects you will see all this information being used again for more advanced and practical purposes. I would like to thank LunaPic that I used for all of the screenshots I made with the red focus boxes. If you have any questions, comments, or suggestions on future projects, post them below and I'll respond ASAP! :D
Comments